Steven Johannessen Antique Radio Gallery
For The Love Of Antique Radio Collecting & Restoration • Established 1997
As part of my effort to promote the hobby I am placing my collection of antique radios online to share with others. I completely go through every one of my radios, and I put each radio online when it comes out of my shop. I start by taking the radio apart and cleaning the chassis and components. Next the components are checked (transformers, resistors, caps, coils, tubes, etc) to make sure they are at least functional. If the components are good the radio is tested. If the radio is not working and the parts are available I will repair the radio. Then, the cabinet is repaired (if needed) cleaned, waxed and polished. The front panel and the knobs are cleaned and polished as needed. The outer hardware is cleaned and polished, and the knobs are re-attached. The radio is then re-assembled.
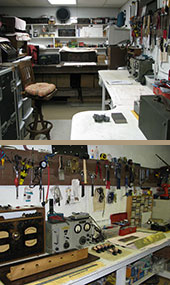
I am using mostly vintage test equipment for repairs. To test tubes I use a military Supreme I-177B because it tests emission reasonably well on most of the very early tube types and is still very rugged for a 65 year old tube tester.
These radios are all interesting to work on (kind of like working on old cars) and each has it's own quirks. Now my goal is to restore each radio as far as possible without resorting to refinishing or altering the radio. I NEVER refinish a radio because to do that would change the radio forever. Many times I will revisit a radio in the collection and bring it to the next level in restoration (from acquisition to cleaned up, cleaned up to restored, restored to looking mint, not working to working, etc.). I guess my ultimate goal (like all who enjoy this) is to have every radio in the collection working and in mint condition.

Copyright © 2007-2022 - All Rights Reserved - Steven Johannessen
Online since 1997 • Last Updated • June 2022